Sunday, June 30, 2013

Memories

Here's a real quick card I made using SVGCuts new collection Bicycle Built for Two, sweet and simple.

The stamp is from Jaded Blossom's Picture This set, this one is a must have, some Lemon Tart Trendy Twine and digital paper is Carta Bella's Cool Summer.


This collection is Free this week with a purchase of $9.98, use code FREEGIFT.


Saturday, June 29, 2013

Happiness On Your Birthday

This pretty printed flower background and poppy cut is from SVGCuts new collection Bicycle Built for Two.  This stamped sentiment from Jaded Blossom's set Sweet Birthday Wishes I think went perfectly in the white space of the card.  I just added some homemade crinkle ribbon, Orange Truffle Trendy Twine with an October Afternoon button, the card was finished in about 10 minutes, can't beat that.


This collection is free this week with a purchase of $9.98 or more, use code FREEGIFT.


Bicycle Built for Two

SVGCuts New Kit


Free this week with $9.98 or more purchase, use code FREEGIFT


Thursday, June 27, 2013

Working With Silhouette Files

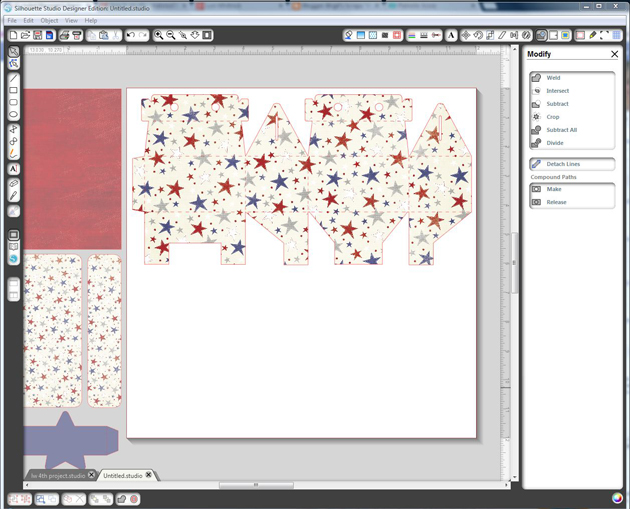
Hi Everyone, I have a couple of helpful hints today, things I do in SSDE to help me prepare my files before I cut them out.  I'll be using Lori Whitlock's 
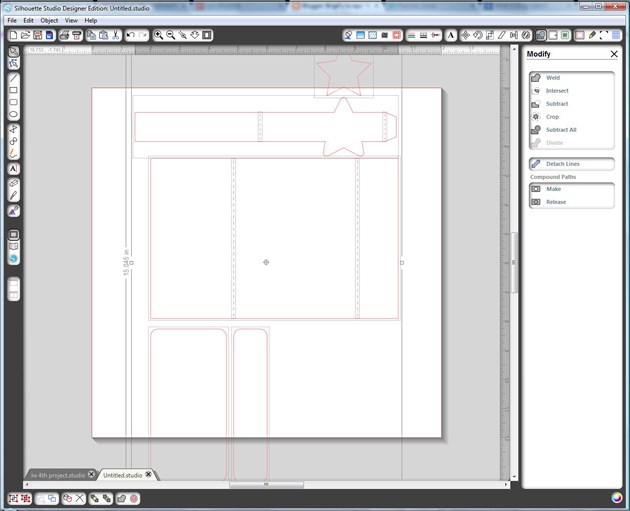
2 boxes on a 12 x 12 file and one of the cards from the belly band set.


The flag on the box is from the patriotic icon set, I resized both of these to make a smaller treat box.  The ungrouped box measures 10.170w x 5.840h and the flag pieces ungrouped measures, stars - 1.580w x 1.060, stripes - 3.015w x 1.905h and the flag box - 3.015w x 1.905h.


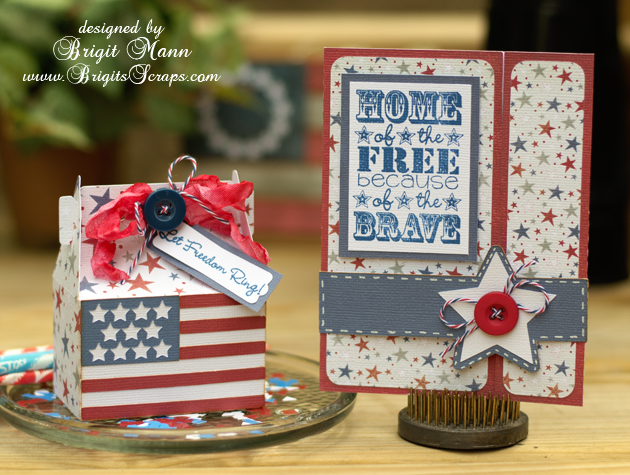
This little treat box is so perfect for some 4th of July party favors!


For this project I used Echo Park's 4th of July Mini Theme digital paper, Stars & Stripes Trendy Twine and Jaded Blossom's Celebrate America stamp set.


When I added the card the pieces are bigger than the mat, so I select all and ungroup.  Notice the score lines, they are ungrouped also, so I click and drag around the card and score lines to select, go to the modify window and select make, you can also right click and select make compound path, but you are going to do the same thing to the belly band and it's easier to have the modify window open so you can select make again.


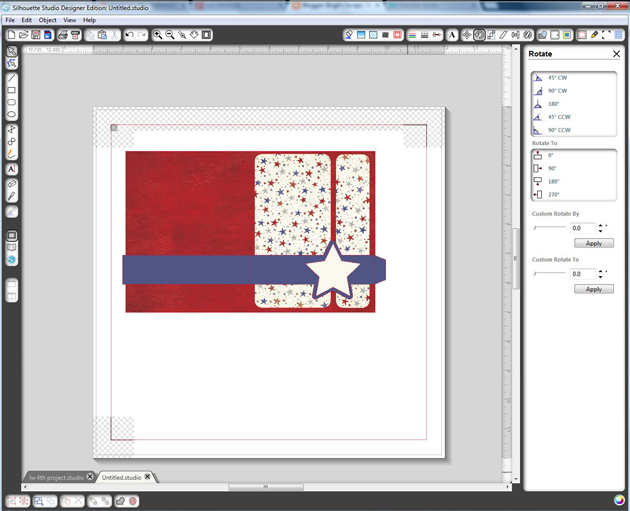
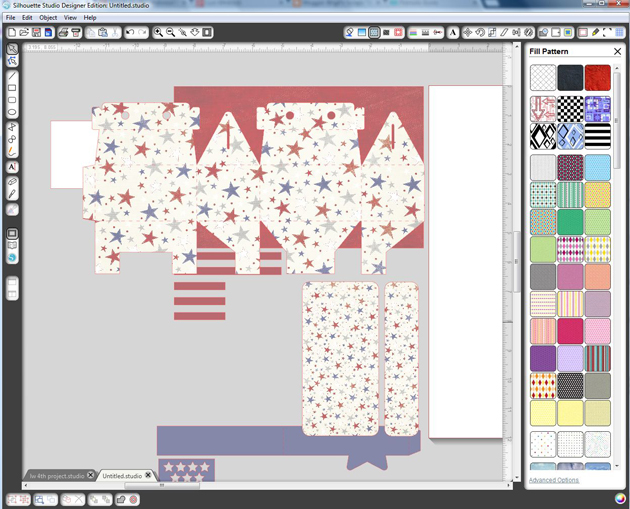
I like to fill with the color or pattern paper I'm going to use and arrange my project to see how it will look.
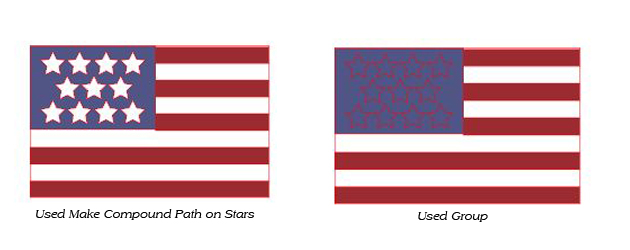
Here is a picture of the flag, I ungrouped but it also ungrouped the stars, if you go to move it and this happens just go to edit and undo move, then click and drag and select over the stars and box and make a compound path.
Here's a picture of the make compound path and group, they both will cut the stars out, but I like to see exactly how it will look with the make compound path.


There are two boxes with this file, so I ungrouped and deleted the other box then resized, (I also did another ungroup and make compound path on this box so I would see the lines when resized and fit the flag.)


I group my pieces together by color or pattern paper.  Keeping your groups to the left side, moving to the mat to cut, then to the right side helps you keep track of what's been cut.


For this project though I did a print n cut on two 12 x 12 pieces of white textured cardstock, (American Crafts 80lb), I arranged and grouped the pieces together.  I then select my group go to the line color window and select none.  Now print n cut, move to the right, place the next group on your mat and finish up.

Thanks for stopping by, I hope these tips help

Saturday, June 22, 2013

Luxury Handbags by SVGCuts

Aren't these beautiful SVGCuts New Kit


Free with a Purchase of $9.98 or more use code FREEGIFT


Thursday, June 20, 2013

Winner of the Summer Blog Hop and Firecracker Card!

Thanks for stopping by and commenting on our Summer Blog Hop, I enjoyed reading all your wonderful comments!  The winner of the $10 Silhouette download card is....
Sandee B
Congratulations Sandee!!

Now here is a quick card using one of the firecrackers from Lori Whitlock's fireworks set.


I used one of the banners from the banner labels set and did a text to path, Traci has a nice tutorial on Lori's blog that you can get here.

I used some Lemon Tart Trendy Twine for the fuse and some Stars & Stripes on the button.  Digital paper is Echo Parks 4th of July Mini Theme collection.

Thanks for stopping by!

Monday, June 17, 2013

Lori Whitlock Summer Blog Hop!

Hello everyone welcome to our Summer Blog Hop!!

You should be arriving here from Lori's blog.

Become a follower and leave a comment below for a chance to win a $10 download card to the silhouette online store!!


I'm so excited summer is finally here!  We spend a lot of time out on our pontoon so it's definitely our fun in the sun and summer memories!  This photo is of my youngest son Willie and his girlfriend Kristen.


I used Lori's Ticket Shaped Frame and decorated it with paper and some elements from Echo Park's A Perfect Summer also designed by Lori.  I really love this frame, it goes together so well and really looks great, would make such a nice gift.

The sun and cloud are both from the Summer Icon set and the sailboat and water I downloaded from the silhouette online store here.

Thanks for stopping by and don't forget to leave a comment, next stop is Christine's blog, hop on over for some more summer fun!

                              Brigit Mann  *****You Are Here*****

Tuesday, June 11, 2013

Take Me Out To The Ball Game

Here's my Father's Day design team project for SVGCuts, perfect for the Dad who loves baseball.


I used some Cranberry Trendy Twine on both projects with buttons from October Afternoon.  The paper and elements are from Echo Park's Grand Slam Mini Collection.


The cute little bears are from SVGCuts Taylor's Team, the collection has other sports also so if your Dad loves golf it's in there.!  I used the happy father's day from the All About Dad kit and the frame from the Sew Crafty kit.


This gift card holder is from the Give A Gift kit, I use this often, so many different holders for all occasions in there.  I put a 1" Epiphany Crafts bubble cap over the Home Run.  The stitching I created in SSDE, I created a real quick tutorial on how to do this in this post here.

Thanks for stopping by, hope you enjoyed my project!!

Monday, June 10, 2013

Hey Cupcake

Here's a cute cupcake set using Lori's files, perfect for a birthday or just to let someone special know how sweet they are!


The paper collection I used is Echo Parks Here and Now designed by Lori.  It's such beautiful paper, I really loved working with it.  Both the card and box are decorated with elements from the collection and some stamp sentiments from Jaded Blossom's set Hey Cupcake.


Here's a closeup of the cupcake easel card, the holes lined up perfectly to the base, I love how it looks.  The decorative liner for the inside added such a nice touch also.


The cupcake shaped box is so sweet, you could put treats inside or a small gift like jewelry or even a cupcake.  The flower and leaves are from Lori's 3D Flower Set 3.

Thanks for stopping by, hope you enjoyed these scrumptious cupcakes!!

Saturday, June 8, 2013

S'more Than A Friend

I think these two boxes together make such a cute gift set to give someone who loves s'mores and who doesn't.  


The top box opens to fit a gift card, such a fun way to give a gift.  Both are from SVGCuts, the cute little s'mores is from the Camp Firefly kit and the bottom box is from this weeks new kit Gift Boxes.  I just resized it so the s'more box would fit on top and added the window.  I'll add the sizes below.


I used a Peachy Keen Face Stamp from the Just Baby set, stamp sentiment from Jaded Blossoms Got S'mores and some Trendy Twine Cranberry which is on sale right now.


The digital paper and elements are all from Echo Park's Happy Camper collections, how perfect even had a s'mores!!

Sizes for gift box to fit s'mores on top.
bottom   8.015w
side1      8.015w
side2      8.015w
lid           9.150w

Submitted to Jaded Blossom's June Challenge Anything Food/Candy Related.